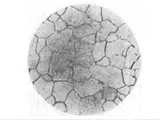
The metallographic examination or metallography of cast, pressed, and sintered materials is of great importance in the evaluation of materials for use in critical components, structures, and products. The purpose of this examination is to identify and characterize the microstructure (size and shape of the crystalline grains) of the material, which directly affects its mechanical properties, such as strength, ductility, and wear resistance. This article focuses on the metallographic examination of cast, pressed, and sintered materials, with a focus on examining their microstructure.
The metallographic examination of cast, pressed, and sintered materials consists of three main steps: sample preparation, microstructure evaluation, and analysis. The first step of sample preparation includes the cutting or grinding of the sample, secondary polishing, and etching of the sample surface to reveal the microstructure. Depending on the material, various cutting methods, such as water jet cutting, laser cutting, and diamond sawing, are commonly used to prepare the sample. Once the sample is cut, it is then polished and etched using various etching solutions, such as acid-dip solutions, which may be followed by boiling or cold treatment, to reveal the microstructure of the sample. After sample preparation, a metallographic examination of the sample is performed.
The metallographic examination is usually performed by scanning the sample for inclusions, voids, porosity, grain size, grain shape, and other microstructural characteristics. Standardized quantitative techniques, such as ASTM E45, ISO 4519, and SEM/EDX analysis, are often used for this purpose. Inclusions are materials that are not part of the materials microstructure, such as hard particles and soft particles. Voids, or cavities in the microstructure, are often formed during the cooling of the material. Porosity, the presence of holes and spaces in the material, can be caused by a variety of factors during the manufacturing process, such as air voids, entrapped gasses, or shrinkage voids. The grain size and shape of the material also affects its mechanical properties, such as ductility, toughness, and wear resistance. The examination of the microstructure can also reveal imperfections or failure due to factors such as improper material selection, careless or inadequate processing, or inadequate heat treatment.
Finally, the examination and analysis of the sample then lead to conclusions and recommendations. These conclusions and recommendations can help to optimize material selection and processing, as well as avoiding costly defects and potential failure in the future.
In conclusion, the metallographic examination of cast, pressed, and sintered materials is an important part of the material evaluation process. Through the examination and analysis of the samples microstructure, engineers can identify potential defects, imperfections, and property variations, and make conclusions and recommendations to optimize material selection and processing, as well as avoiding costly defects and potential failure in the future.


